Sunday 14 December 2014

Appium: Setup for Android - Windows


Appium setup for Android in Windows OS

This post talks about the following sections


   1. JDK Installation
   2. Android SDK Installation
   3. Appium Installation


1. JDK Installation:

  • Go to the Manual download page
  • Check the Accept License Agreement radio button
  • Click on corresponding JDK version, then File Download dialog box appears prompting you to run or save the download file 
    • To run the installer, click Run.
    • To save the file for later installation, click Save
    • Choose the folder location and save the file to your local system.
      Tip: Save the file to a known location on your computer, for example, to your desktop.
    • Double-click on the saved file to start the installation process.
  • Set the environmental variable JAVA_HOME to JDK home directory like below

  • Include %JAVA_HOME%\bin in PATH variable.

2. ANDROID SDK Installation:

  • Go to the Manual download page.
  • Download latest bundle
  • Extract the file to a directory
  • Set the ANDROID_HOME environment variable to sdk (Ex: D:\AndroidSDK\adt-bundle-windows-x86_64-20140321\sdk)
  • Include %ANDROID_HOME%\tools;%ANDROID_HOME%\platform-tools;%ANDROID_HOME%\platforms; in PATH variable.

SDK Manager:

The Android SDK separates tools, platforms, and other components into packages you can download using the SDK Manager. For example, when the SDK Tools are updated or a new version of the Android platform is released, you can use the SDK Manager to quickly download them to your environment.

You can launch the SDK Manager in one of the following ways:
    • From Eclipse (with ADT), select Window > Android SDK Manager.
    • On Windows, double-click the SDK Manager.exe file at the root of the Android SDK directory.
  • You can select which packages you want to download by toggling the checkboxes on the left, then click Install to install the selected packages.


AVD Manager:

An Android Virtual Device (AVD) is a device configuration that is run with the Android emulator. It works with the emulator to provide a virtual device-specific environment in which to install and run Android apps.
You can launch the AVD Manager in one of the following ways
  • Run SDK Manager and select Manage AVDs from the Tools menu.
  • From eclipse you can click on AVD Manager.


    Creating the AVD:

  • Android Virtual Device Manager lets you create, update, delete, repair, and start AVDs

  • Click the New button to create a new AVD and give the AVD details


  • After creating the AVD , you could see the following screen


3. Appium Installation:

You can install the appium in two ways
  • Using node.js
  • Using appium.exe

Using Appium.exe

  • Download latest version of appium from here
  • After downloading unzip the file and navigate to appium folder
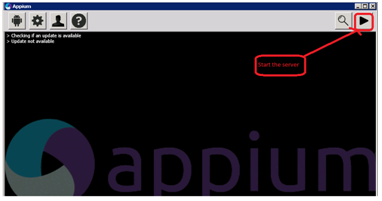
  • Run the Appium.exe file, you could see the following screen

  • To start the server click on start button like below

Using node.js:

  • Go to the Manual download page
  • Download the Windows Installer (.msi)
  • To run the installer, click Run.
  • After installing the node.js open the cmd prompt and use following commands

  • --> npm install -g appium # to install the appium
    --> npm install wd # get appium client
  • To start the server use appium &      
Other popular posts


Friday 21 November 2014

Appium: Remote Execution (Grid Execution)


Appium: Remote Execution (Grid Execution)


Source for this post: official github page

Selenium Grid

You are able to register your appium server with a local Selenium grid (setup docs) by using the --nodeconfig server parameter.
> appium --nodeconfig /path/to/nodeconfig.json
# or, if running from source:
> node . --nodeconfig /path/to/nodeconfig.json
In the node config file you have to define the browserNameversion and platform and based on these parameters the grid will re-direct your test to the right device. You will also need to configure your host details and the selenium griddetails. For a full list of all parameters and descriptions look here
Once you start the appium server and it registers with the grid, you will see your device on the grid console page:
"http://<grid-ip-adress>:<grid-port>/grid/console"

Grid Node Configuration Example json file

{
  "capabilities":
      [
        {
          "browserName": "<e.g._iPhone5_or_iPad4>",
          "version":"<version_of_iOS_e.g._7.1>",
          "maxInstances": 1,
          "platform":"<platform_e.g._MAC_or_ANDROID>"
        }
      ],
  "configuration":
  {
    "cleanUpCycle":2000,
    "timeout":30000,
    "proxy": "org.openqa.grid.selenium.proxy.DefaultRemoteProxy",
    "url":"http://<host_name_appium_server_or_ip-address_appium_server>:<appium_port>/wd/hub",
    "host": <host_name_appium_server_or_ip-address_appium_server>,
    "port": <appium_port>,
    "maxSession": 1,
    "register": true,
    "registerCycle": 5000,
    "hubPort": <grid_port>,
    "hubHost": "<Grid_host_name_or_grid_ip-address>"
  }
}
Valid platforms are listed here
If urlhost, and port are not given, the config will be auto updated to point to localhost:whatever-port-Appium-started-on.
If your Appium server is running on a different machine to your Selenium Grid server, make sure you use an external name/IP address in your host & url docs; localhost and 127.0.0.1 will prevent Selenium Grid from connecting correctly.

Sample nodeconfig.json

{
"capabilities":
[
{
"browserName": "",
"version":"",
"maxInstances": 1,
"platform":"ANDROID"
}
],
"configuration":
{
"cleanUpCycle":2000,
"timeout":30000,
"proxy": "org.openqa.grid.selenium.proxy.DefaultRemoteProxy",
"url":"http://172.20.67.130:4723/wd/hub",
"host":"172.20.67.130",
"port": 4723,
"maxSession": 1,
"register": true,
"registerCycle": 5000,
"hubPort": 4444,
"hubHost": "172.20.68.161"
}
}
Note:

copy your config file to the http://www.jsoneditoronline.org/ ,it will show you the location of syntax error


Below is the screenshot that explains about General Settings for Remote Device execution


Below screenshot explains about json configuration

Friday 20 June 2014

Appium: Connecting Android device through WIFI


We can execute the test cases using either Appium or Calabash by connecting android device to Wi-Fi.

Following are the steps to Connect Android device through WIFI


Prerequisite:


Android SDK is installed.
Connect your device to your PC as usual via usb
Device and Automation Box connected to same WiFI

  • $ adb tcpip 5555 –>This will restart adb and make it work over tcpip.

Disconnect your device now
Ensure that your phone is connected to the same wifi network as your PC.
Get the IP address of your phone (“Settings" -> Wifi -> “Your connected network” -> Your IP address will be shown here)
Run the ‘adb connect’ command

  • $ adb connect <your phones ip address>

You are now connected.
To verify that adb has indeed connected successfully, run -

  • $ adb devices

If it shows your device, then you are good to go with either appium or calabash


Other popular posts:

File Downlaoding using Selenium Webdriver


Saturday 5 April 2014

Selenium WebDriver : How to TakeScreenshot Of WebElement


Selenium WebDriver : How to TakeScreenshot Of WebElement


Every one know that it is possible to take the screenshot of page using Selenium, but most of the people doesn't that there is a possibility for taking the screen of WebElement also....!, you might have a doubt what is the use of taking the screen shot of the element ?

One of the interesting answer is for comparing the images, Surprised.....! but it is possible compare the images using Selenium WebDriver
Here we go.....:)

                   http://qaautomationworld.blogspot.in/

          Selenium WebDriver : How to TakeScreenshot Of WebElement

1. Taking the screen shot of the page. Every selenium automation engineer know it... :)
WebDriver driver = new FirefoxDriver();
driver.get("http://qaautomationworld.blogspot.in/");
File scrFile = ((TakesScreenshot)driver).getScreenshotAs(OutputType.FILE);
FileUtils.copyFile(scrFile, new File("c:\\qaautomationworld\\qaautomationworld.png"));

2. Taking the screen shot of particular WebElement

    
  •  Grab full-page screenshot
  •  Get WebElement position
  •  Get WebElement dimension
  •  Crop WebElement image from page screenshot
  • Save WebElement image to disk

 WebDriver driver = new FirefoxDriver();
 driver.get("http://qaautomationworld.blogspot.in/");
 WebElement element = driver.findElement(By.xpath("//img[@alt='Selenium WebDriver Tips']"));
 WrapsDriver wrapsDriver = (WrapsDriver) element;
 //Get the entire Screenshot from the driver of passed WebElement
 File screen = ((TakesScreenshot) wrapsDriver.getWrappedDriver()).
 getScreenshotAs(OutputType.FILE);
 //Create an instance of Buffered Image from captured screenshot
 BufferedImage img = ImageIO.read(screen);
 // Get the Width and Height of the WebElement using
 int width = element.getSize().getWidth();
 int height = element.getSize().getHeight();
 //Create a rectangle using Width and Height
 Rectangle rect = new Rectangle(width, height);
 //Get the Location of WebElement in a Point.
 //This will provide X & Y co-ordinates of the WebElement
 Point p = element.getLocation();
 //Create image by for element using its location and size.
 //This will give image data specific to the WebElement
 BufferedImage dest = img.getSubimage(p.getX(), p.getY(), rect.width,
 rect.height);
 //Write back the image data for element in File object
 ImageIO.write(dest, "png", screen);
 
 FileUtils.copyFile(screen, new File("E:\\qaautomationworld\\qaautomationworld.png"));


Do comment if you have any queries on this post

Note: Reference for this post Selenium Testing Tools Cookbook